Build a Open Poll with Qoom DB
Introduction
Video List
You can find a full tutorial video here
Goals:
Create a simple survey / poll that is available for anyone to submit their answers and see everyone's response.
Technologies you will Learn:
- How to build an
HTML formthat will send data to an API to be stored in a database - How to fetch all the data from the database using
Javascript's Fetch API - How to use
Javascript Arrayfunctions to transform data from the database into a usable format - How to
Visualizedata usingHTML,Javacript,CSSandEmojis
Getting Started
To get started, go to https://www.qoom.io and signup for your personal coding space. Once in your coding space, create a new project with any name you would like and follow the instructions below.
HTML Structure
Our Quick poll page can be disected into three sections:
- The text at the top, which is our header and can be represented by a
<h1></h1>element.- The actual form the user will use to submit their choice, which is represented by the
<form></form>element.- The results that show what people have submitted, which is represented by the
<div></div>element.
These three elements go inside the <body></body> element as such:
<body>
	<h1></h1>
	<form></form>
	<div></div>
</body>
Next we will add the details for each section, starting with the <h1></h1> element.
Inside this element, just put the text you would like to show on top. For example:
<h1>🍕 Lunch Poll 🍣</h1>
The form element has three more sections inside of it:
- A place to ask a question, represented by the
<label></label>element.- A drop down menu to put in choices, represented by the
<select></select>element.
- Each choice is represented by the
<option></option>element.- A submit button represented by the
<button></button>element.
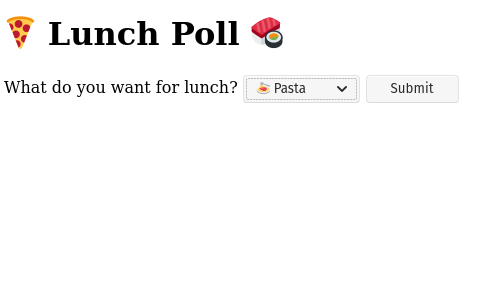
When done your form will look like this:
<form>
	<label>What do you want for lunch?</label>
	<select>
		<option>🍝 Pasta</option>
		<option>🍕 Pizza</option>
		<option>🍜 Ramen</option>
		<option>🥪 Sandwich</option>
		<option>🍣 Sushi</option>
	</select>
	<button>Submit</button>
</form>
Finally let's leave our <div></div> element alone. We will use javascript to inject our data into that element later.
When done, your page should look like this:
Posting Data with HTML Forms
Next we will learn how to send our user's selection to a server, using Qoom's OpenDB API.
The form element has the ability to send data that the user has entered to a server. To unlock this ability you need to do the following:
- Add an
actionattribute which tells the form where to send the data
- Qoom's OpenDB API requires this to be:
/~/quickpoll/open/lunchwherelunchis the name of our poll. This name can be whatever you want it to be. Thequickpollpart is the name of our project. Change this is to the name of your project.
- Add a
nameattribute to each element that the user uses to input data. This tells the server what the data the user entered, represents.- Add an
enctypeattribute which tells the form how to structure the data so that the server knows how to parse it.
- We will use
multipart/form-datasince this structure can handle images and files.
- Add a
methodattribute which tells the form that the data the user entered:
- Will be saved on the server (POST)
- Will be used to find data on the server (GET)
- Add a
valueattribute to the option elements so that the server will know what the user has selected
When done, your form should look like this:
<form action='/~/quickpoll/open/lunch' method='POST' enctype='multipart/form-data'>
	<label>Where should we go for lunch?</label>
	<select name='food'>
		<option value='🍕'> 🍕 Pizza</option>
		<option value='🥪'> 🥪 Sandwiches</option>
		<option value='🍣'> 🍣 Sushi</option>
		<option value='🍜'> 🍜'Ramen</option>
		<option value='🍝'> 🍝 Pasta</option>
	</select>
	<button>Submit</button>
</form>
Now the Qoom OpenDB API also allows us to send a hidden input element that will tell the server where to send the user after the data was submitted. Here is an example of telling the server that we just want the user to go back to the original page.
If you decide to do this, then your form will look like:
<form action='/~/quickpoll/open/lunch' method='POST' enctype='multipart/form-data'>
	<label>Where should we go for lunch?</label>
	<select name='food'>
		<option value='🍕'> 🍕 Pizza</option>
		<option value='🥪'> 🥪 Sandwiches</option>
		<option value='🍣'> 🍣 Sushi</option>
		<option value='🍜'> 🍜'Ramen</option>
		<option value='🍝'> 🍝 Pasta</option>
	</select>
	<button>Submit</button>
	<input type='hidden' value='/~/quickpoll/index' name='redirecturl'>
</form>
Again replace quickpoll with the name of your project. Also replace index to the name of the html page that you want to redirect the user to. You will have to create this page before using it.
If you press the submit button, you should see the page refresh. Then you can go to the OpenDB table view to see your data. To do this go to the Database button, click Use OpenDB ..., select the My Open DB tab, find your table, and click View Data.
Now you have a working Quick Poll that you can use to collect data from anyone with internet access and a modern browser.
Adding CSS to make the Form look better
Before we begin, let's go to https://fonts.google.com and find a custom font. In this example, I use Comfortaa. When done let's import it to the top of the styles.css page like so:
@import url('https://fonts.googleapis.com/css2?family=Comfortaa&display=swap');
Next let's style our body element so that the three sections fit in the middle and center of the page. We will use display:flex to enable the CSS flex box system. In order for the flex system to know how to position things, we need to give our body element a width and height equal to the size of our screen. When done our CSS looks like:
body {
	display: flex;
	flex-direction: column;
	background-color: #fcd9e1;
	align-items: center;
	justify-content: center;
	height: 100vh;
	width: 100vw;
	margin: 0;
	font-family: 'Comfortaa', cursive;
}
Notice that:
- We use
font-family: 'Comfortaa', cursive;to apply our font to the entire bodyheight: 100vh;will stretch the body to be 100% the height of the screen(vh)width: 100vw;will stretch the body to be 100% the width of the screen(vw)margin: 0;will remove the 8px margin that browser adds by default. Without this our page would have scroll bars since the width and height would grow by 16px.
Just using similar CSS we can style all the remaining elements like so:
h1 {
	font-size: 48px;
}

form {
	display: flex;
	flex-direction: row;
	justify-content: center;
	align-items: center;
	gap: 10px;
}

label,
select,
button {
	font-size: 1.25em;
	padding: 5px;
}

button {
	background-color: darkred;
	color: white;
	border: none;
	padding: 5px 10px;
	border-radius: 3px;
	cursor: pointer;
}

button:hover {
	background-color: #600000;
}
Feel free to customize these settings to match your own wishes.
Using Javascript Fetch API to get all the data
We are now ready to work on the fetching the data from the server so that we can show any visitor to our page what people have been selecting. To do this we go to our script.js file and create a function that will do just that.
async function grabData() {

}
Notice the async keyword. This is used so that we can make statements wait until the server comes back with a response before executing the next line of code. You can see this by using the await keyword like so:
async function grabData() {
	const resp = await fetch('/~/openpoll/open/lunch?all=true')
	const json = await resp.json();
}
Now the the Qoom OpenDB API dictates we use the following path /~/openpoll/open/lunch?all=true to fetch all the data. Replace lunch with the name of your poll.
The line const json = await resp.json() will convert the response from our server to javascript object. In this case, Qoom sends use an array of objects. Each object has data that contains information that user has entered previously.
In this case the json data looks like:
[
	{
	  "data": {
	    "choice": "🍣"
	  },
	  "name": "lunch",
	  "project": "projects/openpoll",
	}
	...
]
Transforming the data
The next step is to transform this data into an object that will tell us how many people chose which emoji. We do this by using the Array functions map and filter and forEach to get an object that looks like:
{
  "🍝": 1,
  "🍕": 4,
  "🍜": 1,
  "🥪": 2,
  "🍣": 2
}
So the first thing we need to do is get the a list of all the emojis from our html page:
const emojisElements = document.querySelectorAll('option');
const arrayOfEmojiElements = [...document.querySelectorAll('option')];
const emojis = arrayOfEmojiElements.map(option => option.value);
Note that the
...operator will iterate through all the elements and covert it into an array. This is called unpacking.
When done our emojis variable will be:
emojis = [ "🍝", "🍕", "🍜", "🥪", "🍣" ]
Now let's create a variable called counts that will hold all the counts for each emoji. Then let's go through each emoji and then count all the choices for that emoji like so:
const counts = {};
emojis.forEach(emoji => {
	counts[emoji] = json.filter(choice => choice.data.choice === emoji).length
})
The filter method will take out any element from an array that does not have the emoji we want. The length property then will give us the count.
We now have a variable, counts that holds all the counts for each emoji:
counts = {
  "🍝": 1,
  "🍕": 4,
  "🍜": 1,
  "🥪": 2,
  "🍣": 2
}
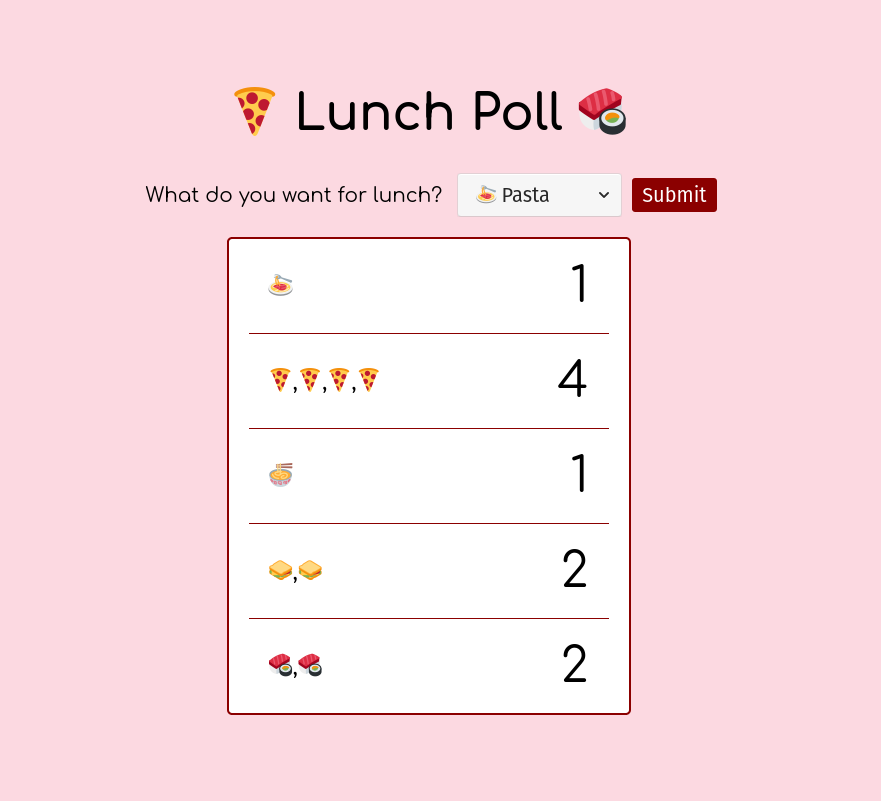
Visualizing the data
Finally we can transform our counts into a pleasing and simple HTML visualization.
In our script.js, we just need to:
- Loop through each emoji
- Create an an array of each emoji that contains nothing but that emoji with a count equal to the number of times that emoji has been selected
- Display this array on the left side of the table
- Display the actual count on the right side of the table
The code that does this, looks like:
const results = document.querySelector('div');
emojis.forEach(emoji => {
	const count = counts[emoji];
	const div = document.createElement('div');
	const emojis = [];
	while(emojis.length < count) {
		emojis.push(emoji);
	}
	div.className = 'row'
	div.innerHTML = `
		<div class='emojis'>${emojis}</div>
		<div class='count'>${count}</div>
	`
	results.appendChild(div);
})
Finally we need to add the CSS to make the visualization appealing. In the styles.css file add the following
div#results {
	min-height: 100px;
	background-color: white;
	width: 400px;
	max-height: 75vh;
	margin-top: 20px;
	overflow: auto;
	border-radius: 5px;
	border: solid 2px darkred;
}

div.row {
	display: flex;
	flex-direction: row;
	border-bottom: solid 1px darkred;
	margin: 0px 20px;
	padding: 20px;
	align-items: center;
	justify-content: space-between;
}

div.row:last-child {
	border-bottom: none;
}

div.emojis {
	font-size: 24px;
}

div.count {
	font-size: 48px;
}
So that this CSS is applied correctly, we need to differentiate the div we use to hold all the results, from the divs we created in javascript. In the index.html file add an id='results' attribute to that div like so
<div id='results'></div>
When done, your page should look like: