Build a Real Login System for Your Website
Introduction
Goals:
- Create a simple Web App with Login functionality.
- Build an Account page that shows the user's information.
- Hide and Show elements based on the logged in state of the user.
Technologies you will Learn:
- Submitting data using the
<form>element to an API - Using
mustachetemplating to control the data shown on the page - The
CSSnecessary to create a simple company page.
Strategy
Video List
You can find tutorial videos here
Need Help?
Get help from the Qoom team and our community members. Join Qoom Community
1. Create a company landing page
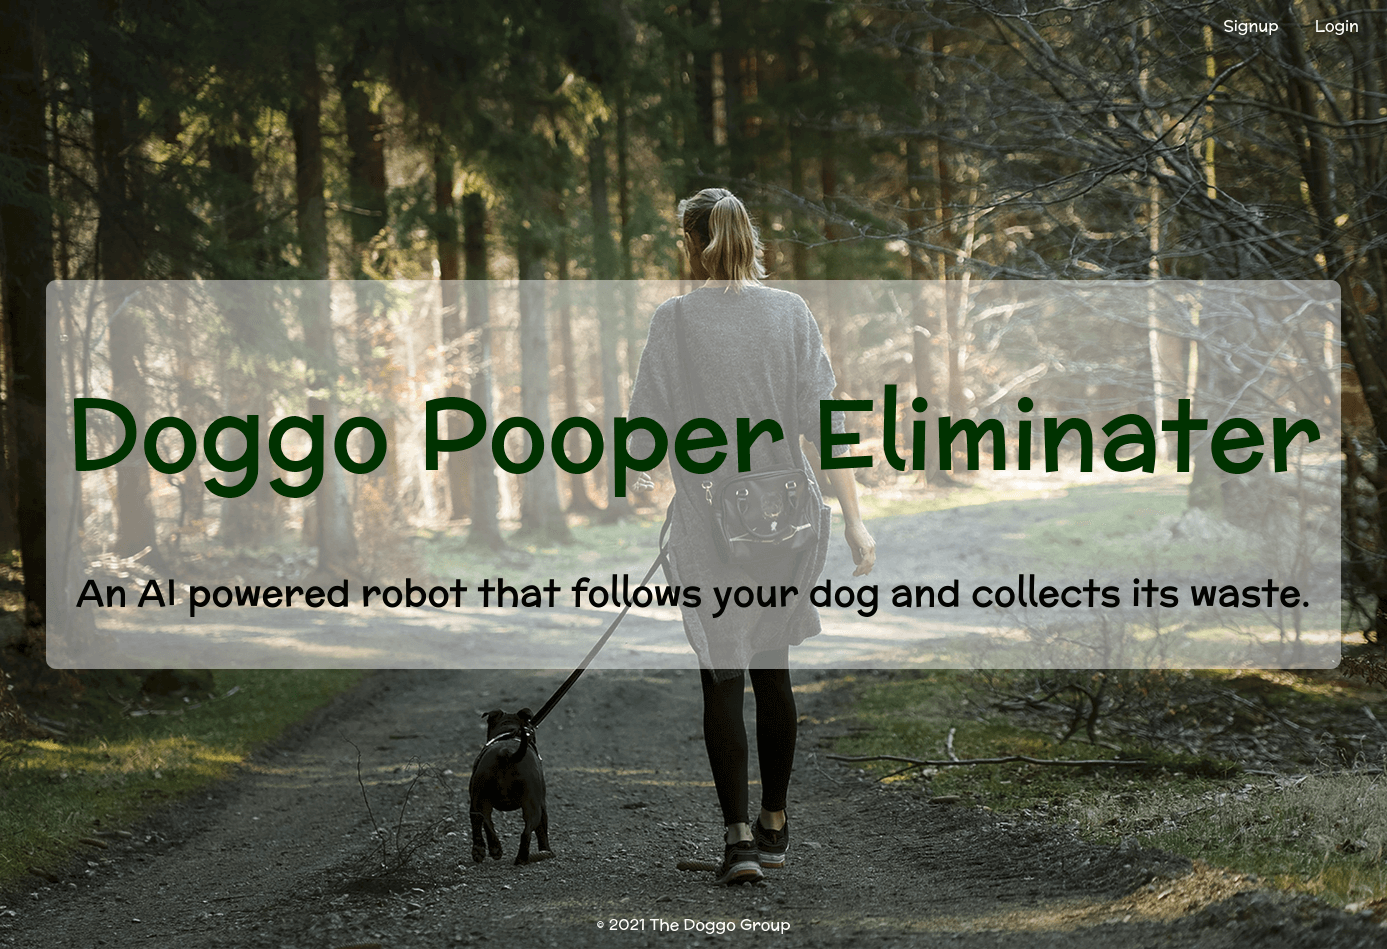
It is hard to create a landing page without a concept and a design. The concept I came up with is a ficticious company called Doggo that created an AI powered robot that follows your dog and eliminates its feces. Lots of company sites have a picture or drawing that covers the entire screen to draw the user's attention. I will follow this design. Here is what I came up with:
You can free images at https://unsplash.com
So lets now implement this design using the following strategy:
- Define the structure of the design using
HTML - Make it look like what we want using
CSS
If you haven't already, create an account on https://www.qoom.io and follow along. We are using Qoom so that we can create a login system without writing any backend code. After creating an account, create a New Project and name it with a fake company name of your choosing. Then add the following html elements to the <body> elements:
<body>

	<nav>WHERE OUR LOG IN CONTROLS WILL GO</nav>

	<main>WHERE OUR IMAGE IS DISPLAY WITH THE TEXT</main>

	<footer>OUR COMPANY NAME</footer>

</body>
Now lets go into each element and define what goes into them. Starting with the <nav> element.
<nav>
	<!-- USERS WHO ARE NOT LOGGED WILL SEE THIS -->
	{{^private}}
		<a href='login'>Login</a>
		<a href='signup'>Signup</a>
	{{/private}}

	<!-- USERS WHO ARE LOGGED WILL SEE THIS -->
	{{#private}}
		<a href='account'>
			<img src='{{avatar}}'>
		</a>
		<a onclick='logout()'>Logout</a>
	{{/private}}
</nav>
We are using a templating engine called Mustache to selectively hide and show elements. You can learn more here. The private flag is native to qoom.io.
Next lets create the html for the main section:
<main>
	<!-- THE WHITE BOX IN OUR DESIGN -->
	<div>
		<!-- THE BIG TEXT IN OUR DESIGN -->
		<h1>
			Doggo Pooper Eliminater
		</h1>
		<!-- THE SMALLER TEXT IN OUR DESIGN -->
		<h2>
			An AI powered robot that follows your dog and collects its waste.
		</h2>
	</div>
</main>
And finally the footer:
<footer>
	© 2021 The Doggo Group
</footer>
Now onto the <head> element. Here we give the browser additional instructions as described in the comments:
<head>
	<!-- MAKE SURE OUR SITE LOOKS GOOD ON MOBILE -->
	<meta name="viewport" content="width=device-width, initial-scale=0.5">

	<!-- THIS TELLS OUR BROWSER TO GRAB THE CSS FROM THIS FILE -->
	<link rel="stylesheet" href="styles.css">

	<!-- THIS TELLS OUR BROWSER TO GRAB THE JAVSCRIPT FROM THIS FILE -->
	<script type="module" src="script.js"></script>

	<!-- THIS ADDS A DOG HEAD TO OUR TAB (aka favicon) -->
	<link rel="shortcut icon" type="image/jpg" href="pug.png"/>

	<!-- THIS PUTS TEXT INTO THE TAB -->
	<title>Sign Up!</title>
</head>
Our site now has all the structure that our design has:

Now we are ready to style the page. Here is the CSS:
/* FEEL FREE TO GO TO fonts.google.com TO CHOOSE YOUR OWN FONT */
@import url('https://fonts.googleapis.com/css2?family=McLaren&display=swap');

body {
	margin:0;
	width:100vw;
	height:100vh;
	overflow:hidden;
	font-family: 'McLaren', cursive;
}

nav {
	position:absolute;
	top:0;
	right:0;
	display:flex;
	flex-direction:row-reverse;
	width:40vw;
	height:50px;
	align-items:center;
	justify-content:flex-start;
	gap: 20px;
	margin-right:20px;
}

nav a {
	color:white;
	text-decoration:none;
	padding:0.5em;
	cursor:pointer;
}

nav a img {
	width:32px;
	height:32px;
	border-radius:50%;
	object-fit: contains;
	background-color:white;
}

nav a:hover {
	background-color:#ffffff75;
	color:black;
	border-radius:3px;
}

main {
	background-image:url(dogwalking.jpg);
	background-size:cover;
	background-position:50% 50%;
	width:100vw;
	height:100vh;
	display:flex;
	flex-direction:column;
	align-items:center;
	justify-content:center;
}

main div {
	margin:0 1em;
	text-align:center;
	background-color: #ffffff75;
	border-radius:10px;
	padding:20px;
	box-sizing:border-box;
}

main div > img {
	width:200px;
	height:200px;
	object-fit: contains;
}

main h1 {
	font-size:96px;
	color:#003200;
}

main h2 {
	font-size:36px;
}


footer {
	position:absolute;
	bottom:0;
	left:0;
	height:50px;
	width:100vw;
	display:flex;
	align-items:center;
	justify-content:center;
	color:white;
}
Our site now looks like what we created above.
2. Create signup page
All the remaining pages we create will use the same CSS and JS file. That way we can have common design and a set of function that any page can use.
So create a new page called signup.html and replace the <head> element with that that is inside of index.html:
Here is the html template we will use for all the remaining pages:
<!DOCTYPE html>
<html>

	<head>
		<meta name="viewport" content="width=device-width, initial-scale=0.5">
		<link rel="stylesheet" href="styles.css">
		<script type="module" src="script.js"></script>
		<link rel="shortcut icon" type="image/jpg" href="pug.png"/>
		<title>Sign Up!</title>
	</head>

	<body>
		<nav>

		</nav>
		<main>
			<div></div>
		</main>
		<footer>
			© 2021 The Doggo Group
		</footer>
	</body>

</html>
Now in our signup page we want to just allow the user to login or go back to home.
<nav>
	<a href='index'>Home</a>
	<a href='login'>Login</a>
</nav>
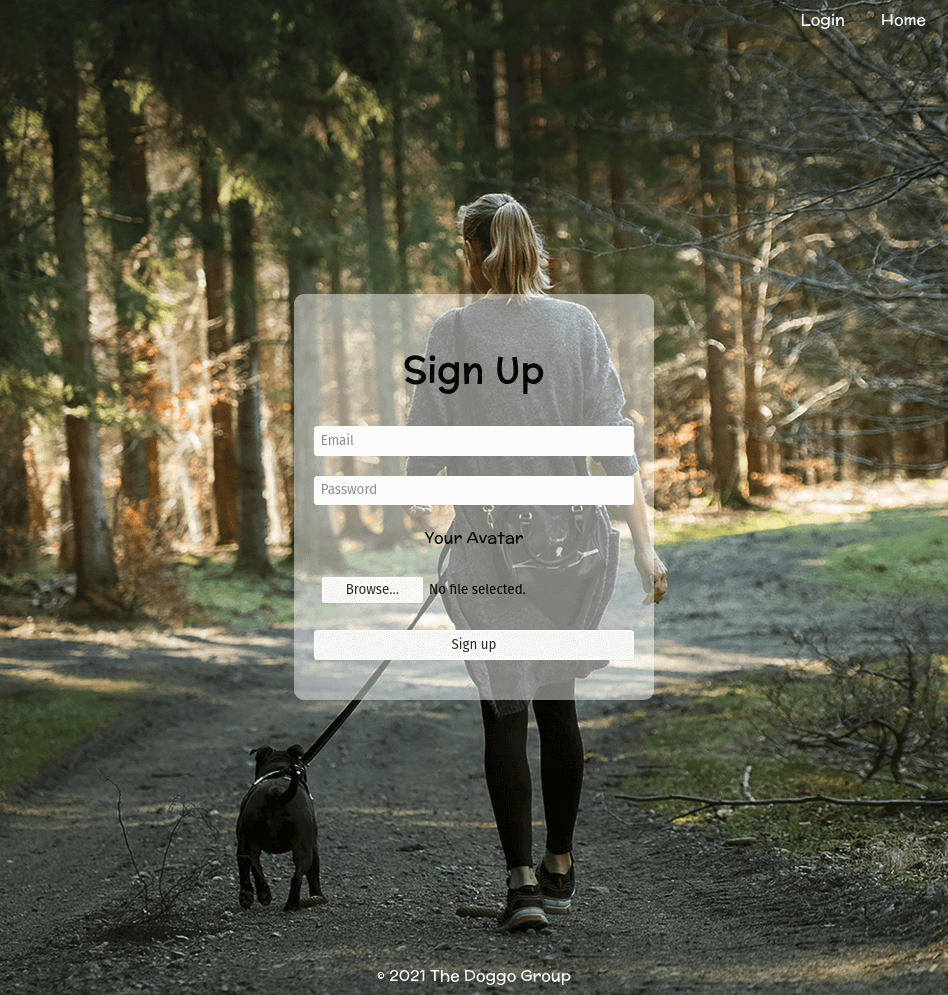
Finally we can create our signup form like so:
<main>
	<div>
		<h2>Sign Up</h2>
		<form action='/~/Doggo/signup' method='POST' enctype='multipart/form-data'>
			<input type='email' name='username' placeholder='Email' required>
			<input type='password' name='password' placeholder='Password' required>
			<label>Your Avatar</label>
			<input type='file' assets='image/*' name='avatar' required>
			<input type='submit' value='Sign up'>

			<!-- THIS TELLS OUR SERVER WHERE TO SEND THE USER AFTER GETTING THE DATA-->
			<input type='hidden' name='redirecturl' value='/~/Doggo/account'>
		</form>
	</div>
</main>
The form element has the following powers:
- action='/~/Doggo/signup': This tells the browser to send the data to the
/~/Doggo/signupfunction that is defined on the server- method='POST': This tells the browser to send the data in a way that the browser can encrypt it. Thus keeping it secret from our ISP.
- enctype='multipart/form-data': This tells the browser what encoding to use to send the data. This encoding allows us to send images.
Finally we can add the css for our form element:
main form {
	display:flex;
	flex-direction:column;
	gap:20px;
	margin-bottom:20px;
	width:320px;
}

main form input {
	width:100%;
	padding:0.5em;
	box-sizing:border-box;
	border-radius:3px;
	border:none;
}

main form input[type=submit]:hover {
	background-color:#dfdfdf;
	cursor:pointer;
}
Our page now looks like this:
3. Create account page
In the account page we can do a lot, but for this tutorial we are going to just show the data the user entered when signing up.
Here is the html:
<!DOCTYPE html>
<html>

	<head>
		<meta name="viewport" content="width=device-width, initial-scale=0.5">
		<link rel="stylesheet" href="styles.css">
		<script type="module" src="script.js"></script>
		<link rel="shortcut icon" type="image/jpg" href="pug.png"/>
		<title>Sign Up!</title>
	</head>

	<body>
		<nav>
			<a href='index'>Home</a>
			<a onclick='logout()'>Logout</a>
		</nav>
		<main>
			{{#private}}
			<div>
				<h2>Your Account</h2>
				<h3>{{username}}</h3>
				<img src='{{avatar}}'>
			</div>
			{{/private}}

			{{^private}}
				<script>
					location.href = 'index';
				</script>
			{{/private}}
		</main>
		<footer>
			© 2021 The Doggo Group
		</footer>
	</body>

</html>
We are using Mustache again to show the account data. We are also using Mustache with some simple Javascript to redirect the user to the home page if they are not logged in.
4. Create logout feature
Now that we have signed the user in, we need to give them a way to log out. To do this, we just need to go to the script.js and create our logout function:
window.logout = function() {

	// TELLS OUR SERVER TO LOG THE USER OUT
	fetch('/~/Doggo/logout', { method: 'POST'});

	// TELLS OUR BROWSER TO SHOW A MESSAGE TO OUR USER
	alert('Logged Out!');

	// REDIRECTS THE USER TO THE HOMEPAGE
	location.href = '/~/Doggo/index'
}
5. Create login page
The login page now is very similar to the signup page. We just need to send the data to a different action on the server like so:
<!DOCTYPE html>
<html>

	<head>
		<meta name="viewport" content="width=device-width, initial-scale=0.5">
		<link rel="stylesheet" href="styles.css">
		<script type="module" src="script.js"></script>
		<link rel="shortcut icon" type="image/jpg" href="pug.png"/>
		<title>Login!</title>
	</head>

	<body>
		<nav>
			<a href='index'>Home</a>
			<a href='signup'>Signup</a>
		</nav>
		<main>
			<div>
				<h2>Login</h2>
				<form action='/~/Doggo/login' method='POST' enctype='multipart/form-data'>
					<input type='email' name='username' placeholder='Email' required>
					<input type='password' name='password' placeholder='Password' required>

					<input type='submit' value='Log In'>
					<input type='hidden' name='redirecturl' value='/~/Doggo/account'>
				</form>
			</div>
		</main>
		<footer>
			© 2021 The Doggo Group
		</footer>
	</body>

</html>
Now we are done!
Challenges:
- Redirect the user, that has logged in, to the
accountpage if they try to access thesignuporloginpages.
- Style the buttons differently on mobile. (Hint: Research
CSS media queries)
- Create a
preview of the profile imagethe user uploaded so they can see it before hitting the sign up button. (This will require you to search the internet for a solution).