Driving Simulator
What You will learn:
- How to create a VR scene with A-frame
- Game design aspects that can be applied to many other types of games
- Random maze generation
Requirements for this tutorial:
- A Strong understand of Javascript and functions
- A Qoom account
- Go to Qoom.io
- On the top right corner Sign Up
- Enter your Coding Space
- Click New Project
- Congrats, You are all set up!
Goals:
- Get comfortable with the basics of A-Frame
- Get inspired to expand upon this or create something of your own!
Tutorial Content:
- What is A-Frame?
- Basic A-frame scene (HTML)
- Environment: Lighting & Shadow & Sky & Ground (HTML)
- First Map (JS)
- 3D models
- Camera (HTML)
- Car Movement(JS)
- Vertical Movement(JS)
- Controller Input (JS)
- Randomly Generated Map (JS)
1. What is A-Frame?
![]()
A-frame is A web framework that makes building 3D/AR/VR experiences easy.
For additional information and different demos of what people have already created check out the official A-frame website. For our project today we will be using version 0.8.0 of A-Frame, so when looking at the documentation make sure to be on the correct version.
The offical A-Frame documentation: https://aframe.io/
2. Basic A-frame scene:
Before we start, play around with the demo! Drive around, if this is something you are interested in making then you've come to the right place. Open up the demo code on a separate tab, create a new coding space and let's jump right into A-Frame!
Installation (Don’t worry it's easy!):
For the method we're using there is no real installation needed, all you need to do is add this script into the head element of your HTML file:
<head>
   <script src="https://aframe.io/releases/0.8.0/aframe.min.js"></script>
</head>
And the
<body>
	<a-scene>
	</a-scene>
 </body>
And you’ve made your first scene! Now let’s add some objects:
There are many A-Frame primitives but we’ll just start with a box. Insert it into your a-scene as shown:
<body>
	<a-scene>
		<a-box></a-box>
	</a-scene>
</body>
This has created a default white 1 meter by 1 meter by 1 meter box. By setting the attributes you can change the box to anything you want.
For example, here is a red, 0.25m by 1.5m by 2m box scaled up by 2 on the y-axis:
<a-box color="red" scale="1 2 1" width="0.25" height="1.5" depth="2"></a-box>
If you don’t see your box at first use your mouse to look down, if you didn’t set a position it should appear right where the default camera is placed (0, 0, 0).
Additionally, WASD keys are set up already in the default camera for basic movement, you can use these for now but we’ll adjust them later.
MUST DO: So you can see your progress as we begin to make scene changes, start by making a simple scene of blocks, spheres, or whatever you like. Just have fun and play with it!
Here's a small list of primitives:
<a-box><a-sphere><a-circle><a-cone><a-cylinder><a-torus><a-plane>For more go check out the official A-Frame documentation!
Helpful tools!:
Click Here to learn about A-Frame Inspection mode
When inside your scene press Ctrl Shift i on Windows, or Control Option i on Mac to enter A-Frame Inspection mode. Very helpful when you want to easily test how different changes would look.
Here's a link to other projects made using A-Frame: https://stemkoski.github.io/A-Frame-Examples/
Now that you have a basic understanding of A-frame, read through the demo code and try to understand it, most of it is javascipt anyways.
3. Environment: Sky & Ground & Lighting & Shadow
Sky & Ground
To add in the sky and ground, we’ll use more A-frame primitives: a-plane and a-sky.
<!-- Sky -->
<!-- For if you have an image
<a-sky src="#sky_image" rotation="0 0 -180"></a-sky> -->
<a-sky color="blue"></a-sky>

<!-- Ground -->
<a-plane material="color: #999999" rotation="-90 0 0" scale="75 75 0.5"></a-plane>
Bonus: How do these work?
But how does an a-sky cover our world? really you can think of it as a very big inverted sphere, showing a color or image to the interior.
And the a-plane is pretty self-explanatory, it's a flat plane we turn -90 degrees on its x-axis and scale up to the size of our world.
With either of these objects you can use an image or a color, so adjust these to your desire.
Lighting:
In A-Frame, there are 5 types of light: ambient, directional, hemisphere, point, and spot.
-
Ambient: General lighting. Doesn't come from a source, thus
position,rotation, andscaleattributes have no effect. -
Directional: Light shining from a direction, no matter where in the scene you are the light comes from the same place. The
positionattribute is more of a ratio than the position of the source. You can think of it like the sun. -
Hemisphere: similar to ambient light but with two colors:
color(color for the sky) andgroundColorattributes. -
Point: think of it like a lightbulb. Light coming from a positioned source.
-
Spot: Unlike the rest of the light types, spot only casts light in one direction. ex. spotlight
In every A-Frame scene there are lights by default and the are set as the following values:
<!-- Default A-Frame lighting -->
<a-entity light="type: ambient; color: #BBB"></a-entity>

<a-entity light="type: directional; color: #FFF; intensity: 0.6" position="-0.5 1 1"></a-entity>
As practice, let's break down this code. First, you've probably noticed that these both have the tag <a-entity> not <a-light>. And what even is an a-entity? An a-entity is an empty object that it is up to the user to define its components. For example, if we want our a-entity to be a box then we need to add the geometry attribute and set it to primitive: box. Likewise, by adding the attribute light we give it the properties of an <a-light>.
Next, let's look at the attributes and see how these lights are different. The first one, is an ambient light with a light gray color and the second is a directional light with a white color, intensity, and position/direction ratio.
Pretty simple, right? Good! In time it will be just as smooth as reading.
However, these are just the default lights, to see how the scene changes when you alter their properties, make your own and play around with them a bit.
Note: When you create a light element, A-Frame automatically disables the default lights. They can also be disabled in the a-scene element by hand.
The lights in the demo are set as:
<!-- Light entities-->
<!--Light Ambient-->
<a-entity light="type: ambient; color: #BBB; intensity: 0.7"></a-entity>

<!--Light Directional: ex. sun -->
<a-entity light="type: directional; color:#FFFFFF; intensity:1.5" position="28.5 38.1 16"></a-entity>
Play around, insert different values and see how this changes the scene.
Shadows:
We have a light source now, so where are the shadows? Shadows have to be implemented separately but don't worry it's not too hard!
To enable shadows, you must do two things:
- Add the
castShadowto your light attribute from your light source (point,spot, ordirectional) - Add the shadow component to every object that you want shadows to affect, and specify whether you want this object to
castorreceiveshadows.
To do more configuring with how the shadows render, add the shadow attribute to your scene.
<!-- Example -->
<a-scene shadow="autoUpdate:true; type: pcf">
	<!-- -->
</a-scene>
As always, if you want more information check out the offical A-Frame documentation on shadows.
Bonus: As our scene gets bigger we also need to expand the area that shadows cover. To visualize this add shadowCameraVisible: true to your light attribute, or go into the A-Frame inspector (Ctrl Shift i on Windows, or Control option i on Mac), click on your light source on the left side bar, and check shadowCameraVisible. You should see a rectangle tilted in the angle of your light source, that zone is where shadow appear. Make the rectangle bigger or smaller with shadowCameraBottom, shadowCameraLeft, shadowCameraRight, and shadowCameraTop.
if you have trouble with these settings, the demo's is set to:
<a-entity light="type: directional; color:#FFFFFF; intensity:1.5; castShadow: true; shadowBias:-0.001; shadowCameraBottom: -50; shadowCameraLeft: -50; shadowCameraRight: 50; shadowCameraTop: 50" position="28.5 38.1 16"></a-entity>
Now that the basics of our enviornment is set let's start on our city!
4. First Map - basic city
Our first section of JavaScript, yay! As this gets more difficult I would recommend opening the web inspector when testing to see the console for debug messages or errors (F12 or Crtl Shift I).
In this section, we will be working towards this:
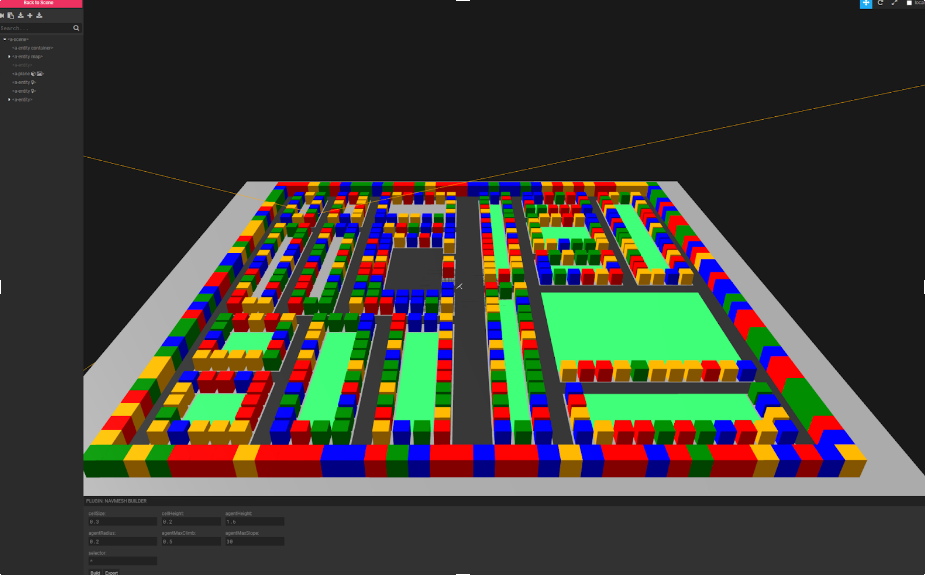
It may look a bit childish but these blocks are just place holders until we get to the 3D objects section then we can make our scene a lot prettier. Now how do we get there?
As you've probably learned by now, placing every building into your scene individually very tedious and will be difficult to change later in development as your html document becomes more cluttered. To make this easier, let's use javascript to write the HTML for us.
Let's start in our HTML document by creating a container element within our a-scene. This will be the container for all of the map objects: buildings, roads, etc.
<!-- Holds all the Building entities-->
<a-entity id="map" shadow="cast:true; receive:true"></a-entity>
Remember: the shadow component is inherited by child objects, so instead of adding the shadow component to every map object, adding it to the map will efficiently do the same thing.
Next, in the javascript file, let's access the map entity we've just created:
// Accesses the map entity
let map = document.querySelector("#map");
Now that we have set up and have access to our container, we need to place objects into our map. As shown in the example above, our city as a 2D grid from a bird's-eye view. A 2D grid can be easily diplayed as a 2D array.
Sample: this is a 9 by 9 2D array, where 1 equals a building and 0 equal free space:
var city = [[1, 1, 1, 1, 1, 1, 1, 1, 1],
			[1, 1, 1, 0, 0, 0, 0, 0, 1],
			[1, 0, 0, 0, 1, 1, 1, 1, 1],
			[1, 0, 1, 0, 0, 0, 0, 0, 1],
			[1, 0, 1, 0, 1, 1, 1, 0, 1],
			[1, 0, 1, 0, 1, 0, 0, 0, 1],
			[1, 0, 1, 0, 1, 1, 1, 0, 1],
			[1, 0, 1, 0, 1, 0, 0, 0, 1],
			[1, 1, 1, 1, 1, 1, 1, 1, 1]]
If its difficult to see the difference between 1 and 0, here's the same array of numbers but color-coded:
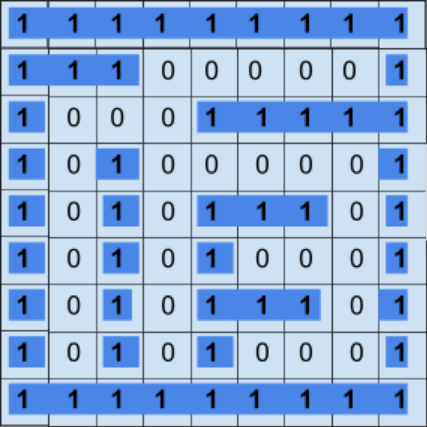
Now that we have the layout of our city, we need to access each value from our array, turn it's index into a position, and then make the HTML that will be displayed in our a-scene.
- Access every value
Test: figure out the code below:
setup();

function setup () {
	map.innerHTML="";
	for (let i = 0; i < city.length; i++) {
		for (let j = 0; j < city[0].length; j++) {
			console.log(city[i][j];)
		}
	}
}
Click Here for Explaination
The code above interates through each row, and in each row interates through every column, accesses each element in the city array and prints it to the console ( which found in the web inspector).
In addition, this process is in a function is so it could be reused multiple times which will be helpful later in Section 10: Randomly Generated Map..
- From
indextoposition
Printing the value to the console is helpful to make sure that we are on the right track but that doesn’t place any objects. We need the index in the array to reflect a building’s position in our scene.
Let's say that each box on our grid is 5 meters by 5 meters, and the starting point is the middle of our grid, then our process looks like this:
setup();

function setup () {
	map.innerHTML="";
	for (let i = 0; i < city.length; i++) {
		for (let j = 0; j < city[0].length; j++) {

			let x = (i * 5) - (2.5 * (city.length-1))

			// y is set in each building type (can't be found in a 2D array)

			let z = -j * 5 + (2.5 * (city.length-1))

			let val = city[i][j]; // access the object type

			addBuilding(x, z, val);
		}
	}
}
Now that we have all the information to set up our objects, let's have our JavaScript write the HTML code with the help of helper functions:
addBuilding, will connect the value in the array to a objectaddEntity, will create the html
Since we don't have very many types of objects yet, all we should have is:
addEntity(id, position, scale, rotation) {
	const entity = document.createElement('a-entity');
    entity.setAttribute('id', id);
    entity.setAttribute('geometry', 'primitive: box');
    entity.setAttribute('position', position);
    entity.setAttribute('scale', scale);
    entity.setAttribute('rotation', rotation);
    map.appendChild(entity);
}

addBuilding(x, z, val) {
	if (val == 0) { // empty space
		// no object made
	} else if (val == 1) {
		y = 2.5
		addEntity("#building", `${x} ${y} ${z}`, "5 4 4", "0 0 0"}
	} // else if (val == next val)
}
If you have your 2D array, city, all filled then you should have a small city of multi-colored blocks.
Bonus Problems:
- Give your buildings a specific set of random colors by adding an additional input to
addEntity. (Note: the color attribute is under the component material) - Add more different objects. Ex. currently the ground is a gray concrete color, set some spaces to be asphalt or green grass (For now these can just be solid color, next section we'll talk about images and 3D objects).
If you get stuck on any of these challenges, read through the demo code, look through the official A-Frame documentation, or Google it, but don't give up!
5. 3D models & Assets
Right now our city looks like a box of crayons, to give our world more flavor and so users know that its really a city, lets give more detail to our world.Within your project make an Asset folder, that's where you will keep all your images and 3D objects.

Now in your HTML document, let's load some assets. Create an a-assets element in your a-scene, this is where you will load all your assets. For images use the img tag and for 3D objects use a-asset-item:
<a-assets>
	<a-asset-item id="asset-id" src="Assets/asset.gltf"></a-asset-item>
	<img id="image-id" src="Assets/image.jpg">
</a-assets>
A-frame takes three types of 3D models: glTF(.gltf or .glb), OBJ(.obj), and COLLADA(.dae). But glTF is recommended by A-Frame and what was used for the demo.
If you want to use the resources from the demo: View Code
If you want to make your own 3D models Blender is a very helpful tool for that!
![]()
- Note: Only Blender 2.80+ can export glTF models without add-on installation
For Blender Tutorials I’d recommend:
- Blender Guru - Many tutorials and it's very inspiring to see what is possible with Blender
- Search up timelapses of what people have already created
But the best tip for learning Blender is really just to play with it. Learn keybindings, get comfortable with camera movement, and practice! If you get stuck, GOOGLE IT. There are many Blender masters out there who can help you.
6. Camera:
The camera is a very important part any video game experience. It dictates what information the player has visual access to at any time.In A-Frame, the default camera takes care of movement as well (As seen in at the end of part 2: Basic A-frame scene).
Bonus Section: Default Camera Settings
<a-entity camera="active: true" look-controls wasd-controls position="0 0 0" data-aframe-default-camera></a-entity>
Let's break down this code:
- Camera attribute, because this element uses the
<a-entity>instead of a<a-camera>
- in addition,
active: truemean that this camera is the one currently being used by the player, useful when you have multiple camera elements- Is look-controls and wasd-controls, as their names suggest enables the ability to look around and move. Just like the default lights, when you add your own camera the default camera is disabled.
In this section we will:
- Set up the camera and camera rig (the car part)
- And then we need to separate the look-controls & wasd-controls, further Car movement will be worked on next section.
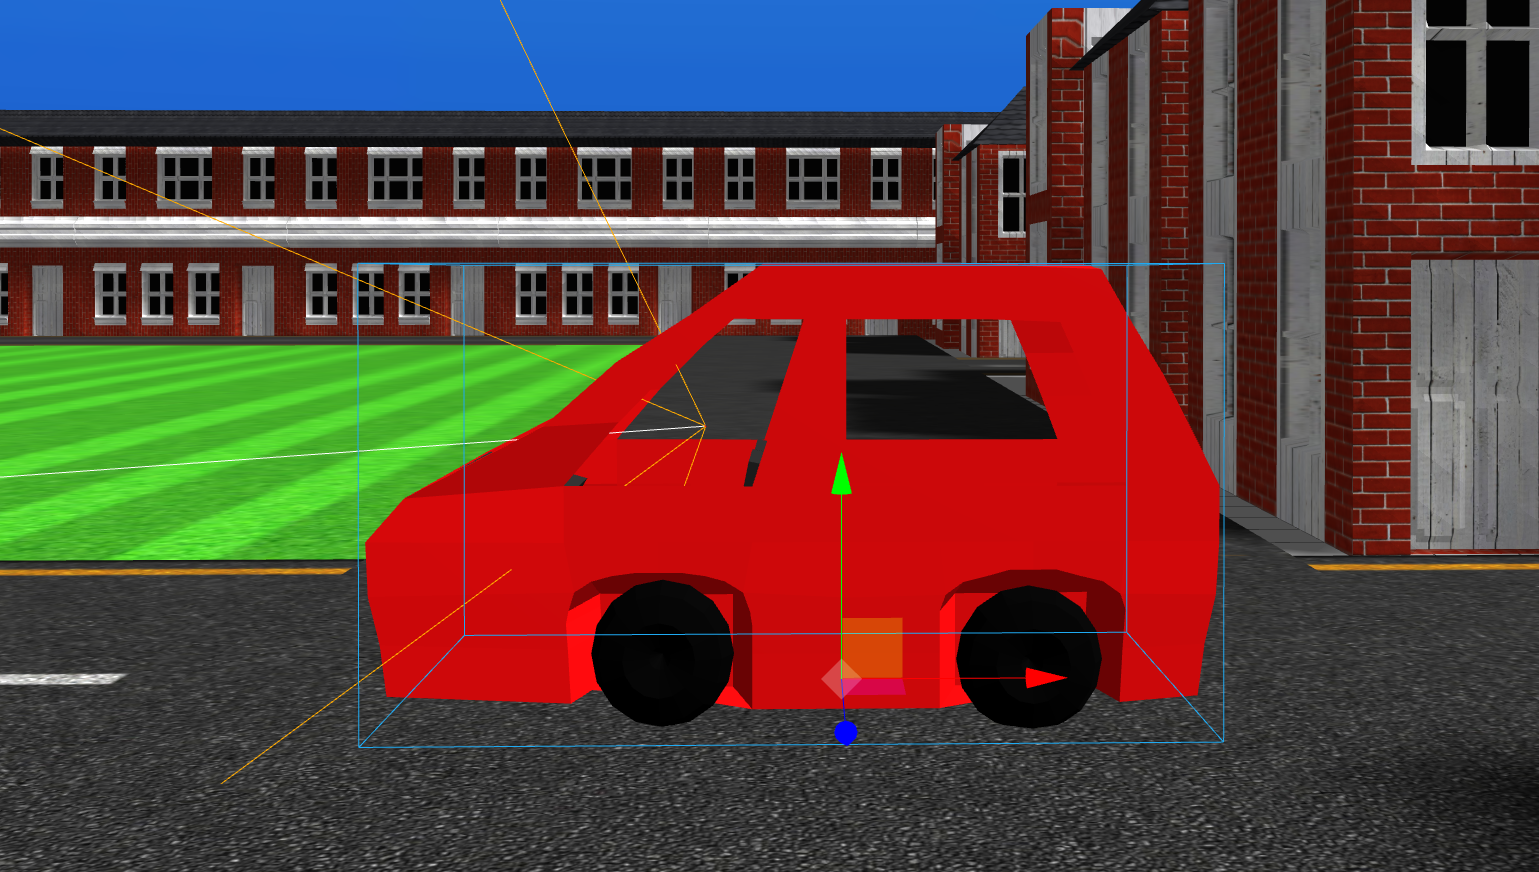
The image above is what we want completed by the end of this section.
- The
camerais the point sitting in the front seat. The yellow rays coming out of the point outline the FOV of the camera. - The
camera rig, in this picture is the car, highlight by the blue outline. It controls the movement, hense being the parent object, carrying the camera with it.
If you haven't already, go into the demo code and download the car object or make your own and add it into your a-assets (Section 5: 3D models & Assets).
- Set up the
cameraandcamera rig
From what we saw in the description above, the camera rig is displayed by the car, and holds the camera object:
<a-entity id="car-object">
	<a-entity camera id="camera"></a-entity>
</a-entity>
Optional: inside the camera element you can add a
<a-cursor>element to get the circle you see in the demo in the middle of your screen.
- Separate Movement and Look Controls
Now to set their attributes:
- The
camera righas themovement-controlscomponent, 3D car model, which needs to start a little bit off the ground (so the wheels don't clip the ground), a little sized down and rotated -90 degrees. - the camera has to be positioned into the front seat of the car and given the
look-controlscomponent, and set toactivein case any other cameras are used. - And the optional
a-cursorwas added
<!-- Camera Rig / Car / Controls are held here -->
<a-entity id="car-object" movement-controls="speed:0.3;" gltf-model="#car" position="0 0.08 0" scale="0.5 0.5 0.5" rotation="0 0 0">
	<!-- Camera -->
	<a-entity camera id="camera" position="-1 2 0.6" look-controls active="true">
    	<a-cursor></a-cursor>
    </a-entity>
</a-entity>
In the next section, we will work on car movement to replace the default movement-controls.
7. Car Movement:
In this section we will go over how to make our own component in A-Frame: extended-wasd-controls. But be warned, there will not be as much instruction for this section. Try your best!
Here's the offical documentation for Writing a Component.
Before we start, create a new JavaScript file and name it movement_script.js or something related to movement.
AFRAME.registerComponent('extended-wasd-controls', {

}
Since there is a lot to do, let's break up our work load into parts:
- Set our defaults
- Helper Functions
- Initization function : Initalize variables and event listeners
- tick function : What happens every frame, updating our vectors and movement
- Set boundaries
Defaults
First, what controls do we need?
- Acceleration (W)
- Brakes (S)
- Turning (A & D)
- Changing gear (1/Parked & 2/Drive & 3/Reverse)
- Change point of view (F/Front & R/Rear) Aside from that, what values do we need:
- moveSpeed
- turnSpeed
- CurrentGear
To define the properties of our component we'll use a schema. So far we should have:
AFRAME.registerComponent('extended-wasd-controls', {
	schema:
	{
		moveForwardKey:     {type: 'string', default: "W"},
		moveBackKey:    {type: 'string', default: "S"},
		// Basic Structure:
		// propertyName: {type: '', default : Value},
		// functionName: function(input) {
		//	**function contents**
		//}
	}
}
TODO: set all of the properties listed above. Once done check with the demo code.
Helper functions
Let's start with some helper functions:
Note: In our initization function we will initalize a set for keys currently pressed, named keyPressedSet.
- convertKeyName: Takes a
keyNameas an input and outputs in a standardized form. - registerKeyDown: Takes a
keyNameas an input and adds it to thekeyPressedSet. - registerKeyUp: Takes a
keyNameas an input and removes it from thekeyPressedSet. - isKeyPressed: Takes a
keyNameas an input and checks if it is in thekeyPressedSet. - switchGear: Takes a
keyNameas an input and switch to that gear. - switchView: Takes a
keyNameas an input and moves the camera's position between the front and rear of the vehicle.
These can be seen in the demo code, please read through it for a better understanding as we will be using them later.
Init function:
In the initization function we need to set up our event listeners for key presses and all our move vectors using the help of our newly made helper functions.
init: function()
	{

		// register key down/up events
		//  and keep track of all keys currently pressed

		this.keyPressedSet = new Set();

		let self = this;

		document.addEventListener( "keydown",
			function(eventData)
			{

				var name = eventData.key;
				var code = eventData.code;
				self.registerKeyDown( self.convertKeyName(eventData.key));

				// Gear changes and Camera switches are check on HERE
			}
		);

		document.addEventListener( "keyup",
			function(eventData)
			{
				self.registerKeyUp( self.convertKeyName(eventData.key));
			}
		);

		// movement-related data

		this.moveVector  = new THREE.Vector3(0,0,0);
		this.movePercent = new THREE.Vector3(0,0,0);
		// x = forward/backward
		// y = up/down
		// z = left/right

		this.rotateVector  = new THREE.Vector2(0,0);
		this.rotatePercent = new THREE.Vector2(0,0);
		// y = turn angle
		// x = look angle

		// used as reference vector when turning
		this.upVector = new THREE.Vector3(0,1,0);

		// current rotation amounts
		this.turnAngle = 0; // around global Y axis
		this.lookAngle = 0; // around local X axis

		// allows easy extraction of turn angle
		this.el.object3D.rotation.order = 'YXZ';
	}
TODO: Read through the code above and try to get a brief understanding of it we will be using it in the rest of this section.
Test: Write the code for listening for gear changes and camera switches with what you know so far and the helper functions we made.
To check your work look into the demo code
tick function
The tick function runs every frame, so this function is in control of changing the movement vectors established in our init function:
tick: function (time, timeDelta)
{
	let moveAmount = (timeDelta/1000) * this.data.moveSpeed;

	// need to convert angle measures from degrees to radians
	let turnAmount = (timeDelta/1000) * THREE.Math.degToRad(this.data.turnSpeed);
	let lookAmount = (timeDelta/1000) * THREE.Math.degToRad(this.data.lookSpeed);
	let maxLookAngle = THREE.Math.degToRad(this.data.maxLookAngle);

	// rotations

	// reset values
	let totalTurnAngle = 0;
	let totalLookAngle = 0;

	// ---Gamepad Inputs for button will go here---

	// need to reset rotatePercent values
	// when querying which keys are currently pressed
	this.rotatePercent.set(0,0);

	if (this.isKeyPressed(this.data.turnLeftKey))
		this.rotatePercent.y += 1;
	if (this.isKeyPressed(this.data.turnRightKey))
		this.rotatePercent.y -= 1;

	// ---Gamepad Inputs for turning will go here---


	if ( this.data.currentGear != 1) // No turning while parked
	{
		this.turnAngle += this.rotatePercent.y * turnAmount;
		this.el.object3D.rotation.y = this.turnAngle;
	}

	// translations

	// this only works when rotation order = "YXZ"
	let finalTurnAngle = this.el.object3D.rotation.y;
	//console.log(finalTurnAngle);

	let c = Math.cos(finalTurnAngle);
	let s = Math.sin(finalTurnAngle);

	// need to reset movePercent values
	// when querying which keys are currently pressed
	this.movePercent.y = 0;

	if (this.movePercent.x -0.03 >= 0) { this.movePercent.x -= 0.03; }
	if (this.movePercent.x +0.03 <= 0) { this.movePercent.x += 0.03; }
	if (this.movePercent.x < 0.03 && this.movePercent.x > -0.03) { this.movePercent.x = 0; }

	// Moving Backwards and Forward
	if (this.isKeyPressed(this.data.moveBackKey)) {
		//console.log(this.data.moveSpeed);
		if (this.data.currentGear == 2 && this.data.moveSpeed-1 > 0) { // Drive
			this.data.moveSpeed = 0;
		}
		this.movePercent.x = 1;
	}

	if (this.isKeyPressed(this.data.moveForwardKey)) {
		if (this.data.moveSpeed < 10) {
			this.data.moveSpeed += 0.1;
		}
		this.movePercent.x = -1;
	}

	// Where gamepad input for movement will be added in

	// forward(-x) direction: [ -s,  0, -c ]
	//   right(-z) direction: [  c,  0, -s ]
	//      up(y) direction: [  0,  1,  0 ]
	// multiply each by (maximum) movement amount and percentages (how much to move in that direction)

	if (this.data.currentGear == 1) { // Parked
		// no change in movement
	} else if (this.data.currentGear == 2) { // Drive
		// Only move forward
		if (this.movePercent.x > 0) {
			this.movePercent.x = 0;
		}

		this.moveVector.set( -s * this.movePercent.z + c * this.movePercent.x, // x
							  1 * this.movePercent.y, // y
							 -c * this.movePercent.z - s * this.movePercent.x ).multiplyScalar( moveAmount ); // z
	} else  if (this.data.currentGear == 3) { // Reverse
		// Only move backwards
		if (this.movePercent.x < 0) {
			this.movePercent.x = 0;
		}

		this.moveVector.set( -s * this.movePercent.z + c * this.movePercent.x, // x
							  1 * this.movePercent.y, // y
							 -c * this.movePercent.z - s * this.movePercent.x ).multiplyScalar( moveAmount ); // z
	}

	// Update Movement
	this.el.object3D.position.add( this.moveVector);
}
Set boundaries
I'm sure you've noticed that you can drive straight throught buildings and way off the map, and that's not right so let's set some game boundaries.
For now, copy and paste the 2D array of our map into movement_script and turn it into ones and zeros (one for wall and zero for empty).
TODO: In the schema write the function, isEmpty that will take a position in the scene and turn it into a index on our 2D array. Once done check with the demo code.
For reference, here's how the index was turned into a position in the map_script.js:
for (let i = 0; i < city.length; i++) {
	for (let j = 0; j < city[0].length; j++) {

		let x = (i * 5) - (2.5 * (city.length-1))
		// y is set in each building type (can't be found in a 2D array)
		let z = -j * 5 + (2.5 * (city.length-1))

		let val = city[i][j]; // access the object type
	}
}
Next, at the end of the movement_script before the movement vectors are added to the position, create a new variable that will find the position that the car will be at.
// Value of new location
	let loc = this.isEmpty(-s * this.movePercent.z + c * this.movePercent.x + this.el.object3D.position.x, -c * this.movePercent.z - s * this.movePercent.x + this.el.object3D.position.z)
With this new variable and the helper function we've just made, now we can check if we are heading into a wall.
TODO: Stop movement if the car is hitting a wall. Check in with the demo code once you are done.
8. Vertical movement:
In this section, our goal is ramps:
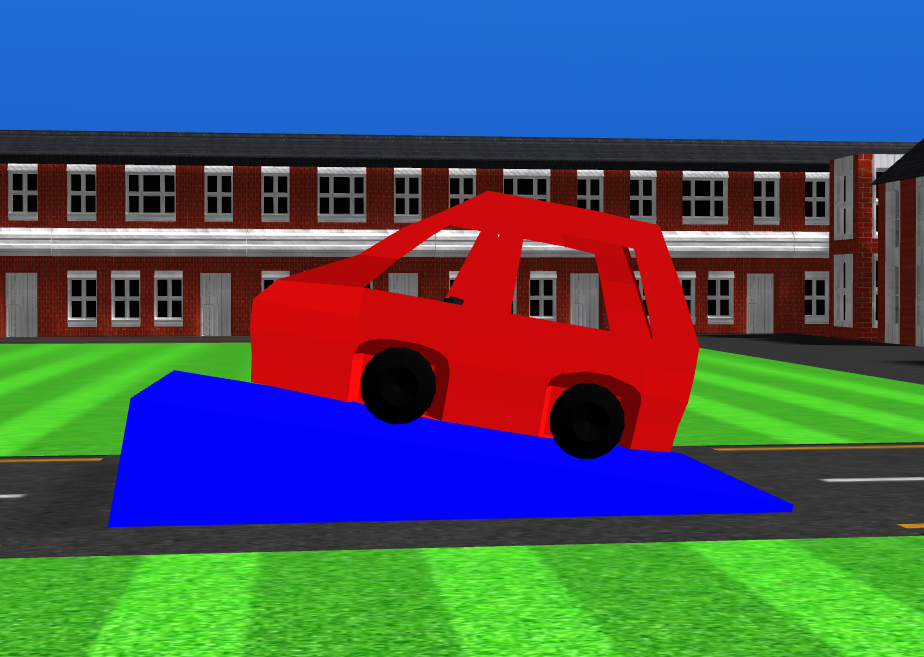
Lets break our goal down:
- The ramp is a object placed by the 2D array,
city - Car's vertical position changes
- Car is rotated upwards
Create a 3D Ramp Object
In the map_script, add a ramp object and place it into the 2D array:
...
} else if (val == __) { // Whatever value you haven't used yet
let y = 0;
addEntity("road_obj", 0, "#road", `${x} 0.1 ${z}`, "5 5 0.5", "-90 0 0")
addEntity("ramp", 2, "blue", `${x} ${y} ${z}`, "3 4 1", "80 -90 0")
}
Note: depending on how you have set up the addEntity function the inputs changes.
In HTML the code above is:
<a-plane id="road_obj" src="#road" position="${x} 0.1 ${z}" scale="5 5 0.5" rotation = "-90 0 0"></a-plane>

<a-entity id="ramp" geometry="primitive:box" color="blue" position="${x} ${y} ${z}" scale="3 4 1" rotation="80 -90 0"></a-entity>
In the movement_script, place 2 where you placed the ramp in the other 2D array (In the randomly generated map section we will connect these arrays but for now keep them seperate).
vertical position & rotation change
Just like how the car stops when about to hit a wall, the car will rise when about to hit a ramp:
let car = document.querySelector("#car-object")

// ... checks walls

if (loc == 2) // loc = the location that we will be in
{
	// console.log(this.el.object3D.position.y);
	if (this.el.object3D.position.y < 0.7)
	{
		car.setAttribute("rotation", "0 0 -10")
		this.movePercent.y += 0.4;
	}
} else {
	if (this.el.object3D.position.y > 0.08)
	{
		this.movePercent.y -= 0.3;
		car.setAttribute("rotation", "0 0 0")
	}
}
9. Controller Input:
The type of player input really affects the game. It constricts what players can and can't do. Think about multiplayer console games, because controllers don't have a full keyboard text communication is difficult aside from premade responses. Or what about phone games, how they’re adapted to have more touch or shake interactions.
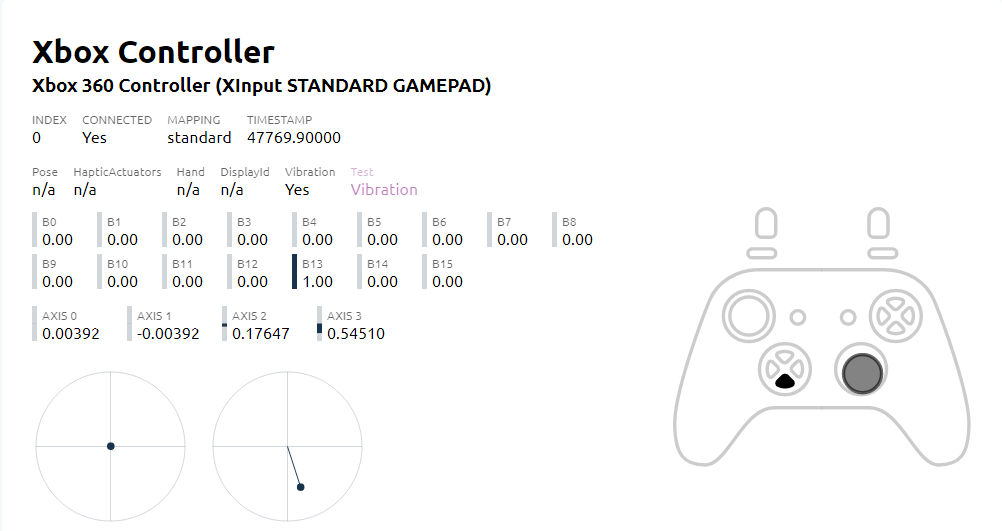
--Note: Controller input is not part of A-Frame, it can be implemented in any webpage or web game you would like. In addition this part will depend on what kind of controller you have.
To Test Controller Input: https: https://gamepad-tester.com/
For More Information about the Gamepad API: https://developer.mozilla.org/en-US/docs/Web/API/Gamepad_API/Using_the_Gamepad_API
In this section we need to accomplish 2 things:
- Check if/which controllers are connected
- Map the controller inputs to movement
Check for Controllers
Above the movement component we made in movement_script, lets add a few event listeners to the window to check for controllers:
var gamepads = [];

window.addEventListener("gamepadconnected", function(e) {
		console.log("Gamepad connected at index %d: %s. %d buttons, %d axes.",
	    e.gamepad.index, e.gamepad.id,
	    e.gamepad.buttons.length, e.gamepad.axes.length);
	    gamepads[e.gamepad.index] = e.gamepad;
	    console.log(gamepads);
	});


window.addEventListener("gamepaddisconnected", function(e) {
		console.log("Gamepad disconnected from index %d: %s",
   		e.gamepad.index, e.gamepad.id);
   		delete gamepads[e.gamepad.index];
   		console.log(gamepads);
	});
Map Inputs to Actions:
As you can see the on the example image shown at the start of this section, There are two kinds of inputs for controllers: buttons and axes(analog sticks).
Buttons give the input of 0 or 1, off or on. Axes on the other hand input 0 to 1 and everything inbetween. Given the type of input, let's assign the buttons and axes to functions.
Let's start with our axes, our two analog sticks:
- Forward and Back (W & S)
- turning (A & D)
// Within the tick function, where turning is checked
if (gamepads.length > 0 && (navigator.getGamepads()[0].axes[2] > 0.4 || navigator.getGamepads()[0].axes[2] < -0.4)) {
	this.rotatePercent.y = -navigator.getGamepads()[0].axes[2]
}

// Within the tick function, where movement is checked
if (gamepads.length > 0 && (navigator.getGamepads()[0].axes[1] > 0.4 || navigator.getGamepads()[0].axes[1] < -0.4)) {
	this.movePercent.x = -navigator.getGamepads()[0].axes[1];
}
The first part of the if condition is pretty standard: check if there are any gamepads connected at all. The second is more confusing, but this is because even when the analog sticks look like they are in the center and not moving, it is slightly tilted. Thats why we need to set a boundary, only when the movement of the analog stick is clearly intentional will the car will move.
Next, our buttons:
- Change gear (1 & 2 & 3 || X & Y & B)
- change point of view (F & R || up-arrow & down-arrow)
// Insert this into your code right before rotation checks
if (gamepads.length > 0) {
	if (navigator.getGamepads()[0].buttons[1].pressed) { this.switchGear(3); }
	if (navigator.getGamepads()[0].buttons[2].pressed) { this.switchGear(1); }
	if (navigator.getGamepads()[0].buttons[3].pressed) { this.switchGear(2); }

	if (navigator.getGamepads()[0].buttons[12].pressed) { this.switchView("F"); }
	if (navigator.getGamepads()[0].buttons[13].pressed) { this.switchView("R"); }
}
Now, you should be able to move your car around with your controller!
10. Randomly Generated Map Algorithm:
What steps do you take when you make a random maze? Do you start by making a main path from start to end and then make other branches?Before we create this algorithm let's do some set up. First, make a new JavaScript document and name it map_maker.js, now we have our blank canvas to start on.
Making the Map:
Well for our city map we have some prerequisites:
- There must be a border wall all around the map
- Long straight roads
- There must be a connection from the start to the end (which is how we move in between maps)
We can do the first part pretty easily. The locations of the border walls and the exits/entrances never change so, we can have those pre-placed.
function cleanUp() {
	for (let i = 0; i < city.length; i++) {
		for (let j = 0; j < city[0].length; j++) {
			let value = city[i][j];

			if (i == 0 || j == 0 || i == 14 || j == 14) {
				if (i == 0 && j == 7) {
					city[i][j] = 0; // entrance/exit
				} else if (i == 14 && j == 7) {
					city[i][j] = 0; // entrance/exit
				} else {
					//city[i][j] = whatever value set to border;
				}
			} else {
				city[i][j] = 1; // building
			}


		}
	}
}
Now everything, aside from the border and exits is set to a wall and we need to carve a path out.
The method we will be using is Recursion Division (with some slight differences since we are not making a maze):
** Recursion Division → if these terms are new to you then you can think about it like divide and conquer. Divide up the problem and start with smaller portions.
Let's say our map is a 2d grid,
xbeing the width of our map andybeing the height:
- If the length of
xandyis less than or equal to 4, then stop (base case)- If the length of
xandyare equal then (dx == dy) split the map in half with a vertical line, and restart the procedure from 1. with each of the new sections- If the length of
xis greater than the length ofy(dx > dy) then randomly split the map into two sections with a vertical road, and restart the procedure from 1. with each of the new section- If the length of x is less than the length of y (dx < dy) then randomly split the map into two sections with a horizontal road, and restart the procedure from 1. with each of the new sections Now let's implement it! Starting with the helper functions. For this we will need two, one for making horizontal and one for making vertical roads to split our map.
Lets break this down into two questions:
- What specifically do we want the program to do?
- We want a to set empty space to a road object from point A to point B on our city array
- what does the program need?
- We need to give it a start position and an ending position and which column or row it is on.
To access one specific row or column to pave our road, we have to keep one of the indexes the same while the other one increments -- singular for-loop time!
function verticalRoad (maxY, minY, x) {
	for (let i = minY; i < maxY; i++) {
		city[i][x] = 5; // Or whatever your road value is
	}
}

function horizontalRoad (maxX, minX, y) {
	for (let i = minX; i < maxX; i++) {
		city[y][i] = 5;
	}
}
Now onto the main part of our algorithm. This is where the recursive part comes in. So we must remember that in a recursive function there must be at least one recursive call and a base case.
If you remember back to our steps we need to find the length of our x and y. For simplicity let's call them dx and dy.
divide(14, 14, 1, 1) // Note: doesn't include border

function divide (maxX, maxY, minX, minY) {
	//console.log(city);
	let dx = maxX - minX;
	let dy = maxY - minY;

	let split;

	if (dx > 4 || dy > 4) {
		if (dx == dy) {
			split = Math.floor((maxX+minX)/2);//Math.floor(Math.random() * dx) + minX;
			verticalRoad(maxY, minY, split);

			divide(maxX, maxY, split+1, minY);
			divide(split-1, maxY, minX, minY);
		}
		if (dx > dy) {
			split = Math.floor(Math.random() * dx) + minX;
			verticalRoad(maxY, minY, split);

			divide(maxX, maxY, split+1, minY);
			divide(split-1, maxY, minX, minY);
		} else {
			split = Math.floor(Math.random() * dy) + minY;
			console.log(split)
			horizontalRoad(maxX, minX, split);

			divide(maxX, maxY, minX, split+1);
			divide(maxX, split-1, minX, minY);
		}
	}
}
If you want to learn more about different maze algorithms or read their description of Recursive Division: https://en.wikipedia.org/wiki/Maze_generation_algorithm
Connecting the Map to every script
At the bottom of the map maker script, export the city, cleanUp function, and the divide function for the use of other scripts:
export{city, cleanUp, divide};
Now to access this information:
in the map_script access the exports from the map_maker script. Here, the export have been labeled chooseName.
import * as chooseName from '/DrivingSimulator/map_maker.js';
Use the city from map_maker script instead of making another array. Hense chooseName.city...:
function setup () {
	map.innerHTML="";

	for (let i = 0; i < chooseName.city.length; i++) {
		for (let j = 0; j < chooseName.city[0].length; j++) {
			let x = (i * 5) - (2.5 * (chooseName.city.length-1))
			// y is set in each building type
			let z = -j * 5 + (2.5 * (chooseName.city.length-1))
			let val = chooseName.city[i][j];

			addbuilding(val, x, z);
	}
}
As we said we would in Section 4, let's export our setup function from map_script just like we did earlier with map_maker:
export {setup};
Lastly, our movement script. it needs to import the map to check for walls and empty spaces in the newly generated maps. As well as the functions we export to change the map.
import * as chooseName from '/DrivingSimulator/map_maker.js';
import * as pickName from '/DrivingSimulator/map_script.js';
Reading the map in the movement_script
var moveMap = chooseName.city;
building_to_value();

function building_to_value() {
	for (let i = 0; i < moveMap.length; i++) {
		for (let j = 0; j < moveMap[0].length; j++) {
			if (i == 0 && j == 7) {
				moveMap[i][j] = 3 // tunnel to next map
			} else if (moveMap[i][j] == 13) {
				moveMap[i][j] = 2;
			} else if (moveMap[i][j] == 0 || moveMap[i][j] == 5.5 || moveMap[i][j] == 5 || moveMap[i][j] == 10) {
				moveMap[i][j] = 0; // empty
			} else {
				moveMap[i][j] = 1; // building
	}
		}
	}

}
Moving from Map to Map
We'll have two methods of moving from map to map: a button, and a zone. Since these to methods do the same thing, lets have a helper function.
restart: function () {
		console.log(moveMap);
		chooseName.cleanUp();
 		chooseName.divide(14, 14, 1, 1);
 		pickName.setup();
 		building_to_value();
 		this.el.object3D.position.set(30, 0.08, 0);
 		this.movePercent.x = 0;
	},
For debug purposes, when you press "O" the map will change.
// In the eventlistener of the init function
if (name == "o") {
 					self.restart();
		 		}
But generally to move from map to map, you have to drive through a tunnel.
if (loc == 3) {this.restart(); }
That is it! Congrats, you've come to the end of this tutorial. You are champion for reading this far! I challenge you to continue with A-Frame, either with this project or one of your own.
Potential Challenges:
- Steering wheel or pedals Animation
- Different options of movement/Player input
- Different methods of map generation
- More detail to the randomly generated cities